
HMS PEGASUS (1776) in Scale 1/64 (Workshop on examples/Практикум на прикладах)
- Olha Batchvarov
- 4 груд. 2021 р.
- Читати 5 хв
Step-By-Step Guide for beginners/ Покроковий посібник для початківців
Chapter #4/Розділ №4
Making the wales/
Встановдення бархоутів
The majority of the kits are offer put a finishing layer of planking, and then to imitate the wales. Because very often they are very difficult to bend and position in correct place. Although it is possible to recognize whether they are made of solid planks, you can only from the stern. Also, the planking of the hull should be parallel to the waless, which is often ignored by the manufacturers and this can be done most accurately only by starting with the installation of the wales...
Більшість комплектів пропонує влаштувати чистовий шар обшивки, а потім поверх імітувати бархоути. Бо дуже часто з ними виникають труднощі при згинанні та правильному розташуванні. Хоча розпізнати чи зроблені вони з суцільної дошки, можна лише з корми. Також обшивка корпусу повинна бути паралельно бархоутам, що дуже часто ігнорується виробниками і зробити це найточніше можна лише почавши саме з улаштування бархоутів...

3-1 Before arranging wales, you must first make the counter or transom, depending on the type of ship you are building:
- If this part of the ship is missing, go to the next step;
- Make the planking and go to the next step.
3-1 Перш ніж влаштовувати бархоути, треба спочатку обшити кормовий підзор або транець, в залежності від типу судна яке ви будуєте:
- Якщо ця частина судна відсутня, переходьте до наступного пункту;
- Влаштуйте обшивку та переходьте до наступного пункту.

Advise/Порада: Bending the planks on the edge with water and a soldering iron./Згинання планок на ребро за допомогою води та паяльника.

Advise/Порада: To make a perfectly smooth strake of planks, the connection can be simulated with a notch by using a scalpel./Щоб зробити ідеально рівний ряд дощок, з'єднання можна імітувати насічкою за дапомогою скальпеля.

4-2 Positioning of the wales. The most difficult part of the work here will be the installation of the first strake of the planks, so before you glue them - you should first fit them perfectly without glue.
- Bend and fit the first strake of planks without glue, you can use nails for temporary fixing but do not drive them to the end;
- Glue the first strake. If the instructions provide for nails, you can drive them to the end at this stage. But if you will remove them, it is better to leave them not hammered to the end to facilitate the process of further removal without damaging the planks themselves;
- Put the remaining strakes of the wales equal to the first and go to the next step.
4-2 Розташування бархоутів. Найважчою частиною роботи тут буде встановдення першого ряду дощок бархоутів, тому перш ніж їх приклеїти - варто спочатку ідеально підігнати їх без клею.
- Зігніть та підженіть без клею перший ряд дощок, для тимчасового фіксування можна використати цвяхи але не забивати їх до кінця;
- Приклейте перший ряд дощок. Якщо в інструкції передбачені цвяхи, то можете забити їх до кінця вже на цьому етапі але якщо ви їх будете видаляти то краще залишити їх не забитими до кінця, щоб полегшити процес їх подальшого видалення без пошкодження самих бархоутів;
- Встановіть решту поясів шпангоутів рівняючись по першому та переходьте до наступного пункту.

Example of installing unpainted wales with metal nails./Приклад з улаштування нефарбованих бархоутів з металевими цвяхами.

Advise/Порада: If you plan to use resin cutting disc - do not forget to provide yourself with minimal protection as they are very fragile and their fragments are very sharp./Якщо ви плануєте використовувати відрізні диски - не забудбте забезпечити себе мінімальними засобами захисту так як вони дуже крихкі і їх уламки дуже гострі.
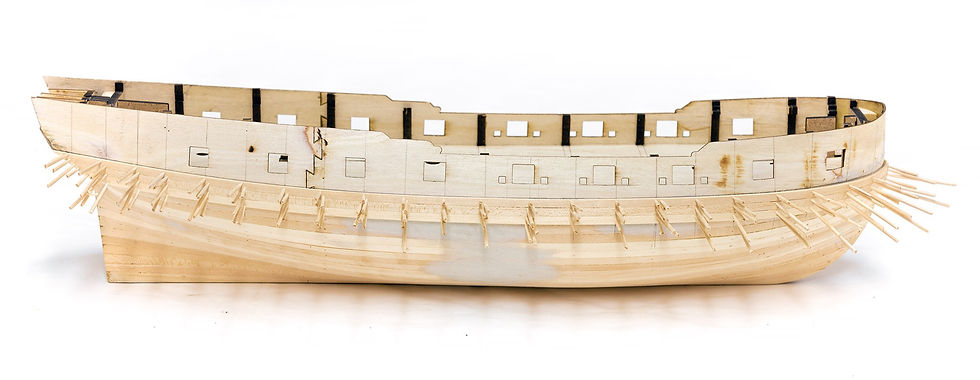
4-3 Installation of nails, bolts and other fastenings. Many manufacturers simplify the design and neglect the fasteners, especially if the model will be painted. But on the contrary, I will create a texture for painting and do it with toothpicks.
- if the model already has nails, go to the next step;
- remove nails that have temporarily fixed the velvet;
- mark and drill all the holes for the bolts (on this HMS PEGASUS I used a 0.50 mm drill/0.0197 inch);
- glue the toothpicks and wait for the glue to dry completely;
- cut the toothpicks and sand the bolt caps and go to the next step;
- if you need to simulate corcs on unpainted wales, sand the toothpicks smoothly and go to the next step.
4-3 Улаштування цвяхів, болтів та інших кріплень. Багато виробників спрощують конструкцію і нехтують кріпленнями, особливо якщо модель буде фарбуватися. Але я навпаки буду створювати текстуру під фарбування і робитиму це за допомогою зубочисток.
- якщо на моделі вже встановлені цвяхи, перходьте до наступного пункту;
- видаліть цвяхи, які тимчасово фіксували бархоути;
- розмітьте та просверліть всі отвори під болти (на даному HMS PEGASUS я використала сверло 0,50 мм|0,0197 inch);
- вклейте зубочистки та дочекайтеся повного висихання клею;
- зріжте зубочистки та відшліфуйте капелюшки болтів та переходьте до наступного кроку;
- якщо вам необхідно зімітувати пробки на нефарбованих бархоутах- відшліфуйте вгладь зубочистки і переходьте до настпуного кроку.
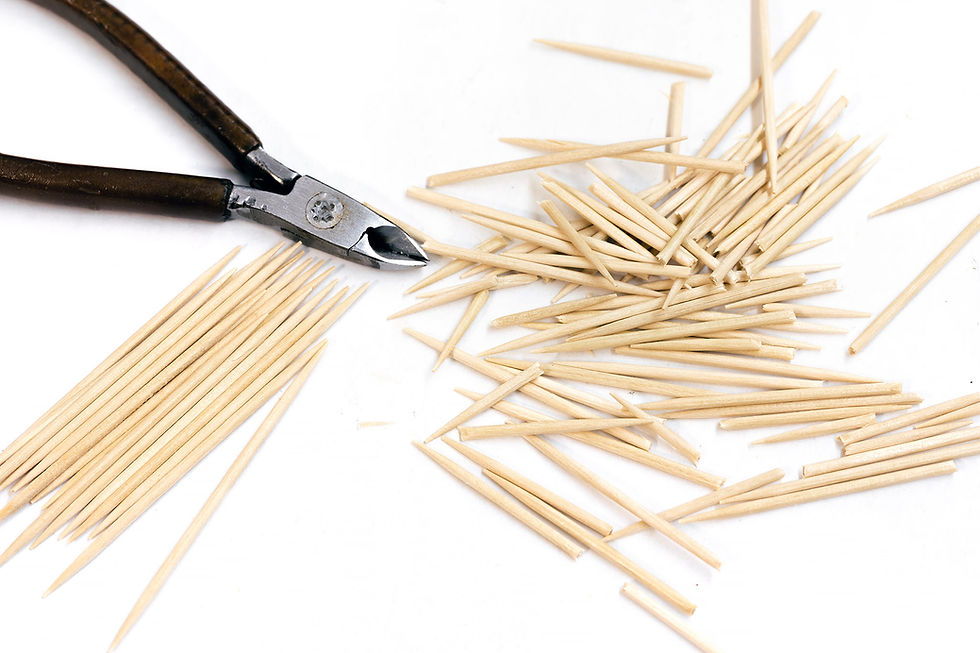
Advise/Порада: For the convenience of hammering toothpicks, they can be cut to different lengths./Для зручності забивання зубочисток, їх можна нарізати різної довжини.
4-4 Painting of wales:
- if the model has unpainted wales - go to the next step;
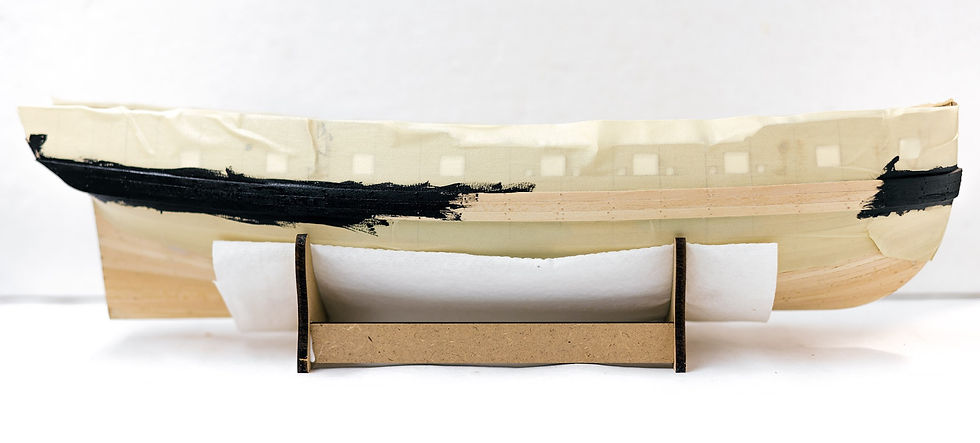
- cover the wales with masking tape and paint them (on this model I used thick matte acrylic paint FolkArt "pure black");
4-4 Фарбування бархоутів:
- якщо на моделі бархоути не фарбуються - переходьте до настпного кроку;
- обклейте малярною стрічкою бархоути та пофарбуйте їх (На даній моделі використана густа матова акрилова фарба FolkArt "чистий чорний");

Advise/Порада: If you are simulating fasteners from a toothpick, then do not cut them close to the wales, leave the tails to round and imitate corks or bolts./Якщо ви імітуєте кріплення з зубочисток, тоді не зрізайте їх впритул до бархоутів, залиште хвостики для скруглення і імітації пробок або болтів.

4-5 Time to assemble the work stand. To further do so as not to damage the paint or planking, it is very convenient to use a work stand, which is provided by many manufacturers, and this kit of the HMS PEGASUS also has one made of MDF.
- if the stand is missing, you can use a piece of foam rubber or polyfoam to prevent damage to the model during construction and go to the next chapter;
- assemble the stand for the model and go to the next chapter.
4-5 Час зібрати робочу підставку. Для подальшої робити аби не пошкодити форбу чи обшивку, дуже зручно використовувати робочу підставку, яку надають багато виробників, так і в цьому комплеті HMS PEGASUS теж є така з МДФ.
- Якщо підставка відсутня, знайдіть шматок поролону чи пінопласту для запобігання пошкодження моделі в процесі будівництва і переходьте до наступного розділу;
- Зберіть підставку для моделі та переходьте до наступного розділу.

Example of a work stand./Приклад робочої підставки.
I filmed the whole process in detail and made this video for you! You can find a playlist with the construction of HMS PEGASUS on my YouTube channel, and can ask any questions to which you did not find the answers here!
Весь процес я зняла в деталях на відео і зробила для вас цей випуск! Ви можете знайти на моєму каналі плейлист з будівництвом HMS PEGASUS, та задати питання на які ви не знайшли відповіді тут!


Коментарі