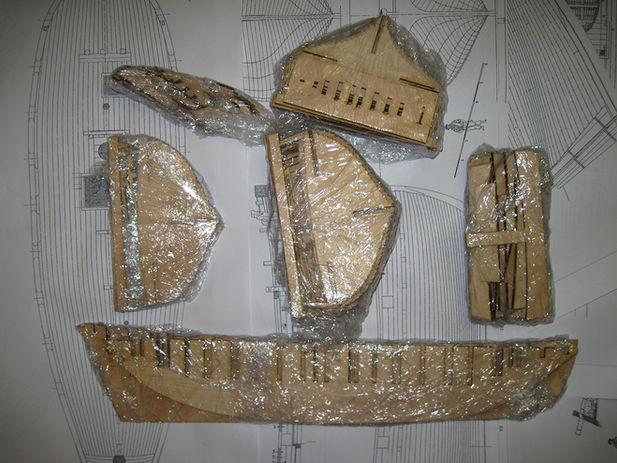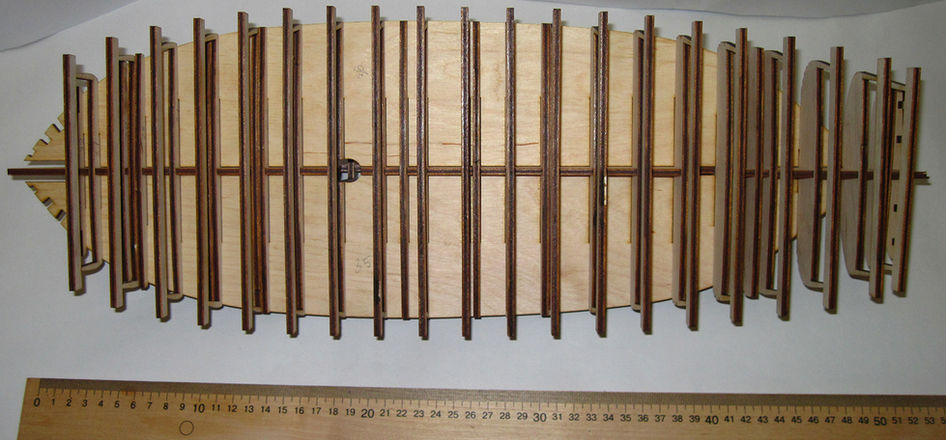

Кіль Le_Cerf на моїй верфі на столі був закладений в червні 2014 року. В AutoCad зроблена карта розкорою шпангоутів і кільової рамки. Одразу з зазубринами під клінкерну обшивку. Що досить швидко дозволяло обшивати корпус планками, тільки звужуючи рейки в носовій та кормовій частині під кутом (клином). Першим обшився транець та кормовий підзор. Я вирішила не використовувати фарбу, а робити всі деталі з штучно виготовленого дорогоцінного чорного грабу. Клінкерна обшивка буде виконана з груші, різблення планую робити самостійно із самшиту і сподіваюсь мій олень не буде схожим на рогату корову - це буде перший досвід різблення по дереву...


Але під впливом старшого покоління судомоделістів всеж піддалася на аргументи і поклалась на досвід інших, - що в мене не вийде так зробити ідельно рівні пояси обшивки. Тому зрізала наполовину готовий клінкер (як виявилося цей метотод клінкерної обшивки був дуже міцним - ледве зняла залишки на шпангоутах) і повністю заповнила шпації між шпангоутами вільхою. За зарубками (рештки від зубатих шпангоутів) зробила розмітку для обшивки на гладкому корпусі. Щоб приклеювати один пояс обшивки, доводилося робити фальш-планку для запобігання сповзанню дошки обшивки. Через цей незручний нюанс - обшивка була дуже повільним процесом. Не більше одного пояса в день, так як доводилося чекати повного висихання кожного. І також площа приклеювання зменшилася, бо кожна дошка не прилягає належним чином до корпусу, а лище кромкою торцової частини рейки. Тобто тримається на склеєній поверхні тільки між собою і в місцях де клінкер сходиться в обшивку в гладь (в районі форштевня та у кормовій частині біля ахтерштевня). І з цього досвіду скажу - що перший варіант міцніший і надійніший. Краще доводити до кінця все що планується і самостійно здобувати досвід ніж слухати чиїсь поради. Особливо якщо це застарілі методи, що були прийнятними коли ще неіснувало AytoCAD та точної лезерної різки...

Паралельно почала виготовляти деталі кіля, форштевня і ахтерштевня. Знову ж таки з груші австрійської (рожевої) та чорного грабу. Я це роблю на циркулярці, хоча їх теж можна вирізати лазером, зробивши карту розкрою матеріалу в AutoCad. Але, так як лазер не дає 100% перпендикулярної різки, я все ж вирішила, що це краще зробити вручну. І, доречі, це дуже цікавий процес підганяти замки деталей до ідального стану. На цьму роботи з моделлю призупинені з січня місяця 2017 року, в зв'язку появи великого і термінового будівництва іншої моделі на замовлення...
Після перерви в більше 3 років:

З березня 2020 року були відновлені роботи над моделлю. Новий етап в будвництві Le Cerf в новій країні і в новій майстерні. Багато чтого тепер буде робитися по новому на цій моделі - розповім все по порядку. Нарешті повністю закінчила клінкерну обшивку і замінила майбутні рамки портів з горіха на грушу. Так як горіхова деревина досить пориста і не дуже гармонійно поєднується з грушею. Тому за допомогою паяльника демонтувала старі вставки і встановила нові. Тут я використала лісову грушу, що була висушена разом з дубом і тепер має жовто-коричневий віддітнок під маслом. Горизонтальна частина рамок портів - буде встановлена після завершення зовнішньої обшивки.

Далі почала нарощувати транець - чорнову заготовку сформувала на пательні з м'якої деревини тополя та змайструвала тимчасову конструкцію, що триматиме транець в правильному положенні аж до повного завершення зовнішньої обшивки. Та почала встановлювати бархоути і паралельно вичищати клінкерну обшивку від залишків клею і підганяти під встановлення форштевня і ахтерштевня. Бархоути виконані з чорного грабу - деревина тверда але обробці все ж піддається і адекватно гнеться. За цей довгий період перерви та і під час переїзду було втрачено кілька деталей ахтерштевня і заготовка деталей для форштевня - тому доведеться вирізати і підіганяти заново. До речі тут в мене закінчилася Австрійська груша і я почала шукати тут нові джерела з рожевою грушею...

Тим часом паралельно виготовила шлюпку для Оленя і весь процес можна подивитись на відео.


Після заваершення клінкерної обшивки і бархоутів - я нарешті встановила кіль і ахтерштевень. Форштевень тільки частково бо його повністю зможу монтувати тільки після завершення всієї зовнішньої обшивки. Нарешті настав час гвоздювання і для цього я нарізала 3500 цвяхів! Сподіваючись що цього повинно вистачити на весь корпус.
Щоб перевернути модель на кіль і вже зафіксувати в правильному положенні довелося просверлити і встановити 2175 цвяхів (це на клінкері разом з транцем).
Переворот корпусу на кіль - це такий ключовий момент в будівництві коли нарешті модель набуває вигляду реального вітрильника. Вимальовуються справжні лінії судна і виглядає модель так більш реалістично ніж догори дригом. Та і решту робіт з обшивки та гвоздювання вже буде набагото зручніше виконувати як раз в такому положенні.
Після важкого клінкеру - обшивка вгладь пішла як по маслу. Тут вде можна було притискати рейки звичайними струбцинами. Одразу прорізала орти, щоб сформуваати потім їх верхню і нижню частину. Після завершення зовнішньої обшивки я зробили заготовку для фотштевня але покищо її не буду вкнеювати так як вона мені покищо заважатиме при формуванні внутришньої обшивки бортів - до форштевня я ще повернуся пізніше...
Після повного завершеня зовнішньої обшивки я нарешті зрізала фальш-бімси і тепер можу формувати борт. Також нанесла розмітку де влаштовувати уключини але їх вирізатиму також пізніше, коли обшию борти з середини. Це було потрибно щоб просверлити борт для гвоздювання.


Для формування портів я використала направляючу рейку - під неї формувала у горизонтальному положенні рамки. Відкрила для себе новий дуже корисний інструмент (подарований знайомим стоматологом) дзеркальце, щоб не крутити весь час модель - ним я змогла пильнувати правильність встановлення деталей без підтікання клею, що пришвидшило роботу. Та заповнила пусті промжки між шпангоутами мякою деревиною холлі, щоб потім сформувати борт під внутрішню обшивку. Тут я застосувала невеликий брусок з крупною шкуркою №150.


Тепер можна взятися і за внутрішній борт. Першим буде встановлюватися ватервейс і вже від нтого буде іти обшивка бортів. Ватервейс - дуже важлтйвий елемент конструкції судна. В ньому повинні бути встановлені по три шпігати з кожного боку, які я вирішила робити з двох половинок. Тобто імітувати зі сторони бархоутів та на самих ватервейсах.
Ватервейси виготовила з груші за допогою саморобної циклі із вже затупленого леза для скальпеля. Щоб зігнути їх у носовій частині на досить малий радіус - довелося прокип'ятити протягом 40 хв.


Спочатку сформувала їх на кастрюлі малого діаметру але не висушуючі повнстю - встановила на місце до повного висихання. В мене це зайняло 2 доби, а тим часом почала нарізати смужки з латуні для формування квадрвтних шпігатів (латунний лист 0,3 мм)...
Пісдя сушки - ватервейси набули потрібної форми і вже розігнути їх стало не можливо. На цьрму етапі я врізала в них внутрішні половинки шпігатів. Та поставила зовнішні половинки ватервейсів, що врізаються в верхню планку бархоутів.
Перш ніж приклеювати ватервейси на місце - настав час застелити чорновий настил. Вирівняти поверхню під чистовий палубний настил не знімаючі малки на шпангоутах. Це я зробила за допомогою широких рейок тополя та вишліфувала на чисто. Після чого нарешті змогла вклеїти ватервейси на місце.
Таким чином, під час встановлення ватервейсів, вдалося виконати і підготовчі роботи для настилу палуби...

І тут вже почалося найцікавіше! Спочатку я обшила борт зсередини. Використала для цього деревину мадроне. Також дошки одразу робила з імітацією цвяхів, бо після встановлення їх важко буде робтит на моделі! Обшивку кормової частини, де розташований отвіер для пера руля, я зробиоа з рожевої груші, як і ватервейс. Ці два типи деревнини схожі за текстурою але різні за кольором і будуть контрастувати в загальному вигляді.
Після завершення обшивки бортів, я нарешті змогла прорізати уключини для весел.

Влаштування палубного настилу - один з найвідповідальніших процесів. Палуба весь час буде на першому плані і отримує найбільше уваги від "глядача".
Я вирішила зробити настил з так званого castello boxwood - цу різновид самшита. Він має більш жовтіший колір ніж європейський самшит, який ми звикли бачити на боделях (зазвичай моделісти з нього роблять всі декоративні елементи та різблення).
Для контрасту я додала Swiss pear (рожеву грушу) для контрасту і зробила з неї посилені пояси настилу. Люки я теж планую робити з цієї груші...


